Wednesday, May 2, 2012
Illuminating Data
This exhibit reminding me of the "Talk to Me" exhibit at the MOMA that I visited last fall. Both exhibits featured works that communicated data in an artistic and creative way that could be understood by the public. In the Illuminating Data exhibition, artists presented work that communicated data through sculpture, prints, animation, and dynamic presentations. One of my favorite pieces was from Christopher Baker, who programmed thermal receipt printers to collect common twitter topics and print them using a custom software. The effect was awesome as the paper descended from the wall. Another favorite was Riley Harmon's "What It Is Without in the Hand that Wields It. He created a network of tubes hooked up to a video game that dispenses blood when a player dies. I thought this concept was very intriguing because it made the violent video game experience more realistic. It gives the characters more of a human-like quality, which makes actually playing the game unsettling. Over all, the projects were very interesting and I look forward to seeing more of these types of projects in the future.
Class trip: AAUGA
The class trip to AAUGA opened my eyes to what is possible in the world of animation. Although I felt as though the skill level was way beyond where I currently am, the presentations were inspiring. I took a particular interest in the presentation that focused on correcting a mesh. The utilization of both maya and mudbox and the communication between the two programs prompts endless possibility... that is if I can get a hang of these programs. I also enjoyed the composite presentation that turned a 3D set into a 2D render with different shaders. This presentation opened my eyes to the amazing quality of maya renders and how you can control the effect of the renders. I especially enjoyed when she animated the renders. I am definitely considering looking into the process and animating sequences in the future. Overall, the trip was overwhelming because I realized how much I did not know, but it was also inspired me to keep exploring the programs that the animation world has to offer.
Thursday, April 26, 2012
ABSTRACT:
For my final, I decided to continue working on the scene that I had presented for my midterm. I took on the project to make an entire room using the objects I already made. The finish product came out to be a living room complete with a working fire place and candles and a grandfather clock with moving pendulum. Most of the objects from the midterm were incorporated but finished with different textures. The table lamp was the only piece that didn't make it into the finished product, but the beaded pull-string was used for the standing lamp.
<frame sequence 1> open on flower vase and camera pans up to window
<frame sequence 2> curtains blow and camera turns toward side wall
<frame sequence 3>zooms into picture frames and moves toward clock
<frame sequence 4>clock pendulum swings and camera zooms into fire place
<frame sequence 5>scene finished with zoom out of whole room
FINAL PRODUCT:
PRODUCTION LOG:
 (unrendered view)
The finished look is of a contemporary living room. I started out with the idea of the fireplace and everything came together around that. When the lights are "on" an off-white area light (intensity 1.2) appears in scene approx. 230 frames. At this point, the blue spot light (1.5) disappears. This effect was done using key frames.


 The fireplace is my favorite part of the project.It was built using multiple cubes. The mantle was made using nurb cubes as well, but the component points were either smoothed or stretched out to make a pleasant detail. The inside of the fire place has a rock(floor) and brownian surface(sides). The outside has a file texture of stones that I edited in photoshop. The mantle has a brown phong and the platform is a marble texture.
The flame was made using the same tutorial as the candle. The fire is sitting on two cylinders with a wood texture.
EVALUATION:
I am very happy with how the final product came out. I think it's clean, has a mood, and appropriately conveys the conventional living room idea that I was going for. If I had more time, there are a few things I would have liked to change or edit. When the camera pans toward the clock, it becomes noticeable to the viewer that there is no ceiling to the room. I originally hoped to build that ceiling and add a fan or chandelier, but I ran out of time. (This is something to consider adding in future additions). Also, at the end of the camera sequence, when it is zooming out, the viewer again can see the a hole where the floor and wall stop. This is a minor distraction that I would like to edit out in the future. There were also a few holes in my models that should be corrected.
I would also like to play around with the clock more. I think that I could add a more realistic texture for the outside and the pendulum, but most importantly, I would have liked to add a second hand on the clock. When the camera zooms in, it would be nice to see the seconds ticking by to complement the pendulum.
I also tried adding an arm chair to complement the couch, but the way the room was set up, the camera wouldn't be able to catch it without showing an empty background. As I revisit this project in the future, I would really like to add a full background to utilize the whole floor space and have the camera focus on each object.
In the future, I would like to keep working with different textures and building on the shading techniques. I did the best I could with some of the objects, but I had a lot of trouble working in the attribute and hyper-shade editors to get some of my textures to fit the right way.
As the room comes together, I think it would be nice to bring the final render into Finalcut and add music to the scene. This would package the whole project for a nice portfolio piece.
Over all, for being a beginner to Autodesk Maya, the final product is something I can be proud of. I think this was a challenging and worthwhile introduction to the program. I look forward to learning more of what it has to offer and seeing what I can create in the future.
For my final, I decided to continue working on the scene that I had presented for my midterm. I took on the project to make an entire room using the objects I already made. The finish product came out to be a living room complete with a working fire place and candles and a grandfather clock with moving pendulum. Most of the objects from the midterm were incorporated but finished with different textures. The table lamp was the only piece that didn't make it into the finished product, but the beaded pull-string was used for the standing lamp.
<frame sequence 1> open on flower vase and camera pans up to window
<frame sequence 2> curtains blow and camera turns toward side wall
<frame sequence 3>zooms into picture frames and moves toward clock
<frame sequence 4>clock pendulum swings and camera zooms into fire place
<frame sequence 5>scene finished with zoom out of whole room
FINAL PRODUCT:
PRODUCTION LOG:

The finished look is of a contemporary living room. I started out with the idea of the fireplace and everything came together around that. When the lights are "on" an off-white area light (intensity 1.2) appears in scene approx. 230 frames. At this point, the blue spot light (1.5) disappears. This effect was done using key frames.

This is a close up of the coffee table in the center of the room. The flower vase is the same object that was featured in my midterm, but the petal color has been altered to compliment the colors in the room. The table that it is sitting on is the same table that was in the midterm as well, but the table legs have been shortened using the scale tool. The newspaper was a touch that was added towards the end of the process. I thought it would give the room more of a feeling of home. It was made using two nurb planes and altered point components. The look was completed by taking file textures (two news paper pictures from google images) to make it look like a real paper.

The couch was probably the most challenging piece to create. After searching tutorial after tutorial online, I was unsuccessful in finding some assistance. As a result, I modeled this while looking at reference images of couches from google images. Looking bottom to top, the legs were made using nurb cylinders. The radius of the top/cap was increased using the stretch tool. The final look has a wood 3D texture found in the attribute editor. The colors were edited. The base is a cube and cushions are cylinders that have been stretched and molded. The component points were moved to shape the cushion and the final result was duplicated (edit>duplicate special). The back cushions and pillows were made using cubes with moved component points to have a puffy/stuffed look. The back support is a cube with moved component points to make rounded edges. The arm rests were made by using the pencil tool to create the shape. The shape was then duplicated and lofted. (surfaces>loft). This made a hollow shape so I needed to fill it in using two planes by moving the nurb components. The couch was texturized using a texture found on google images to give it a suede look and the pillows were covered with the same texture (google images) used for the curtains to match.

This image shows a nice view of the lamp that is seen in the back corner during the final video. The shape of the stand was made using the CV curve tool on top of a lamp reference image. The image was imported (.iff format) on a plane. I drew on top of the image using the curve tool and revolved the line when I was finished. The chain of the table lamp was imported from the midterm. The shade was also made using the CV curve tool, but without a reference image. The texture for the shade is an off white lambert and a gold blinn for the stand. The light that you can see shining too the floor is a yellow spotlight (intensity .800/cone angle 84).

These curtains were made in the midterm and have maintained their animation and structure into the final. The only thing that has changed is the texture. I found a red curtain pattern on google images that I changed into .iff format to import into maya. The black ties have also been tightened using the stretch and move tool to make them look more realistic.

In order to add more character to the room, I added some family photos. The frames were made using cubes that were stretched into rectangles. The shape was duplicated from the frame seen in the midterm. After grouping the objects, I could rotate to a landscape using the rotate tool. The pictures are a file texture on a nurb plane. I felt this was an important and pleasant touch to the room to pull the scene together and make it look like an actual family living room.

I had the idea of a grandfather clock in the back of my mind while I was modeling the room. It was one of the last objects I modeled in the room. It was made using a similar techniques as the lamp and arm rest. I took a reference image of a clock and imported it as a file image on a plane. Then, I used the pencil tool to build to bottom arch. The shape was duplicated, lofted, and filled in with three nurb planes. The base is a cube with the bottom component points pulled out to give it character. The same approach was used for the detail in the middle and the top. The clock was textured with a brown lambert. The pendulum was made using as cylinder, altered nurb circle, and a gold, blinn texture. The pendulum was animated using key frames. Every 24 frames (one second), I would rotate the group (cylinder and circle) to the opposite side to make the illusion that the "pendulum" is swinging.
The books in the screen shot were made using one cube. Three of the four sides were moved in to make it look like pages. Then, I duplicated the group twice and resized each copy. Each book uses a different labert shader for the cover and a pale gold lambert for the pages.
The picture seen in the bottom left is the same object from my midterm with a different shader on the picture frame.

The candle stick was made using CV curves and revolving the line. The candle consists of two cylinders. One uses a white lambert and the other (smaller at the top), which has been scrunched to appear like wax, uses a darker lambert. The wick is a lambert shaded small cylinder.
The flame was made with the help of an online tutorial (http://cg.tutsplus.com/tutorials/autodesk-maya/how-to-create-an-awesome-fire-effect-using-maya-fluids/). I added a glow behind the candle by using a red-orange area light (intensity .2).

The flame was made using the same tutorial as the candle. The fire is sitting on two cylinders with a wood texture.
EVALUATION:
I am very happy with how the final product came out. I think it's clean, has a mood, and appropriately conveys the conventional living room idea that I was going for. If I had more time, there are a few things I would have liked to change or edit. When the camera pans toward the clock, it becomes noticeable to the viewer that there is no ceiling to the room. I originally hoped to build that ceiling and add a fan or chandelier, but I ran out of time. (This is something to consider adding in future additions). Also, at the end of the camera sequence, when it is zooming out, the viewer again can see the a hole where the floor and wall stop. This is a minor distraction that I would like to edit out in the future. There were also a few holes in my models that should be corrected.
I would also like to play around with the clock more. I think that I could add a more realistic texture for the outside and the pendulum, but most importantly, I would have liked to add a second hand on the clock. When the camera zooms in, it would be nice to see the seconds ticking by to complement the pendulum.
I also tried adding an arm chair to complement the couch, but the way the room was set up, the camera wouldn't be able to catch it without showing an empty background. As I revisit this project in the future, I would really like to add a full background to utilize the whole floor space and have the camera focus on each object.
In the future, I would like to keep working with different textures and building on the shading techniques. I did the best I could with some of the objects, but I had a lot of trouble working in the attribute and hyper-shade editors to get some of my textures to fit the right way.
As the room comes together, I think it would be nice to bring the final render into Finalcut and add music to the scene. This would package the whole project for a nice portfolio piece.
Over all, for being a beginner to Autodesk Maya, the final product is something I can be proud of. I think this was a challenging and worthwhile introduction to the program. I look forward to learning more of what it has to offer and seeing what I can create in the future.
Wednesday, March 21, 2012
LOWMAN animation
In class, we were asked to make an animation using lowman. This is an unrendered plablast of lowman doing a flip.
Monday, March 19, 2012
midterm project

The slinky ended up proving difficult to do on my personal computer and with my skill level....The slinky ended up shattering into a million pieces. I chose a different approach to my midterm.
ABSTRACT/ STORY BOARD
For my midterm, I have decided to model part of a living room. The room will include an open window and a table with objects of a home. The animation will consist of the parts displayed in the story board below.
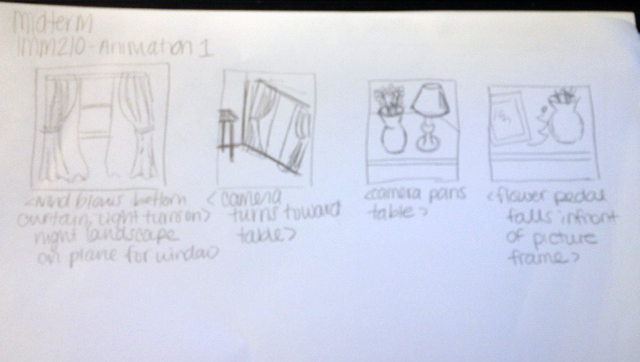
Frame 1: curtains <wind blows curtains, light turns on> night landscape on plane for window.
Frame 2: <camera pans toward table>
Frame 3:<camera pans table>
Frame 4:<Flower petal falls in front of picture frame>
PRODUCTION LOG
I decided to build everything within the same scene. I began with the flowers, which are built using CV curves and nurb planes for the petals. The petals were made by arranging the cv points with the move, rotate, and scale tools. Each petal used a lambert/ramp shader. The vase was made using CV cuves and finished with a blinn/ramp shader. Using key frames, one petal is animated to float down in front of the picture frame and land on the table. I positioned the petal during each key frame using the move and rotate tool. (http://www.youtube.com/watch?v=brPuVPvQgQM)

The table was constructed with a nurbs cube surface and revolved CV curves for the legs. It was finished with a black shiny blinn shader.
The lamp was made using revolved CV curves for the body and the shade as well. The shape was perfected using the scale and move tool. Spheres were used to form the chain. During the animation, this light is "turned on". Using key frames, (roughly 4 seconds into the movie), a point light is brought into the scene and an ambient light (intensity .600) is centered above the room.
The picture frame is made with 4 cubes positioned into a frame and a 5th cube formed for the appearance that it is holding up the frame. The frame is finished with a purple lambert shader. A plane is placed in the center with a file shader. The picture is of my little cousin and me in Australia this past winter.

I used the pencil tool to make the shape of the curtains. The curve was duplicated and lofted. Then, I used the lattice tool (animation>create deformers>lattice) to get the final shape, which includes an indentation for a torus to "hold back" the curtains. I added a second set of curtains that were made using the same process. This set was then animated using key frames and the lattice tool to set the positions. (http://www.youtube.com/watch?v=Z6S_5Cta6Uc) The final product shows a wind effect through the "open" window. The window was constructed using the CVcurve tool and cubes. A plane with a file shader was used to make it look as if it were night time outside. A spotlight was set to only shine on the picture so it would be illuminated before the lights were "turned on". A second spot light with a dark blue tint was used to light the room.

The rest of the room is made using 3 planes with lambert shaders. The siding decoration at the bottom is a modified cylinder.
Finally, I created a camera that would travel throughout the scene. The camera and where it would aim were key framed separately. Following the plan in the story board, I animated the camera to begin with a shot of the curtains, then pan along the wall, and finally finish with a shot of the petal falling in front of the frame.
This is the final product
EVALUATION
The project was a beneficial introduction to maya autodesk. I was able to use all the basic knowledge and even some online tutorials to create something that I am proud and that can be easily built upon.
I am very pleased with the project up to this point, I still have not decided whether or not to continue this project for my final. However, I do have a few ideas going forward. I would like to increase the detail on all of the objects in the room to make them look more realistic. For example, I would like to put a pattern texture on the curtains and the lamp shade. I have also considered a chandelier that would hang from the ceiling and clock that would be mounted on the wall. I have also considered the possibility of doing a whole room, but I would like to focus on enhancing the enhancing the look of everything that was featured in the midterm.
Wednesday, February 22, 2012
midterm proposal
After days of trying to figure out what to do for my midterm I decided to animate a slinky going down the stairs. I've found some tutorials online that will help me with the design and mechanics of this animation. None of these, however, have fully set a scene. The story board is below.

I plan on using curves for the banister and bars. For the steps i'll make a carpet and rug out of the nurbs plane and importing designs I've made in photoshop. The slinky will be the hardest part but i'm feeling pretty confident that I can complete this in the time allotted to me. Updates on progress to follow....

I apologize for the poor quality. Essentially, the scene will open with girls giggling (finalcut addition) and the slinky will begin to propel down the steps. Once it hits the bottom a "the end" sign will show across the bottom of the slinky.
HW nurb curves model
For this assignment I decided to make a simple tea set using CV curves. I used CV curves for the top and body of the pot. A nurb torus is used for the bottom and to create a small decoration on the bottom of the cup. Curves were also used for the shapes of the cup and the plate. Another torus was created and transformed to make the handle of the cup.


I decided to add a spoon and the appearance of tea in the cup. The spoon was made with a sphere for the top and a cylinder for the handle. I decorated the handle with another cylinder and torus around the middle to complete the design. The tea is made with a plane with a brown color on low opacity.

I want to play around with this scene a little more in the future by animating the teapot using key frames. I would like to used particles to create water flowing into the cup. I've stumbled across some tutorials to help me complete this idea. Below are the final render views (front and back).


Subscribe to:
Posts (Atom)