Wednesday, March 21, 2012
LOWMAN animation
In class, we were asked to make an animation using lowman. This is an unrendered plablast of lowman doing a flip.

Monday, March 19, 2012
midterm project

The slinky ended up proving difficult to do on my personal computer and with my skill level....The slinky ended up shattering into a million pieces. I chose a different approach to my midterm.
ABSTRACT/ STORY BOARD
For my midterm, I have decided to model part of a living room. The room will include an open window and a table with objects of a home. The animation will consist of the parts displayed in the story board below.
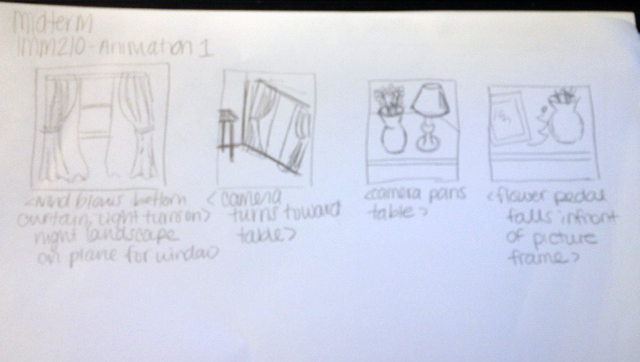
Frame 1: curtains <wind blows curtains, light turns on> night landscape on plane for window.
Frame 2: <camera pans toward table>
Frame 3:<camera pans table>
Frame 4:<Flower petal falls in front of picture frame>
PRODUCTION LOG
I decided to build everything within the same scene. I began with the flowers, which are built using CV curves and nurb planes for the petals. The petals were made by arranging the cv points with the move, rotate, and scale tools. Each petal used a lambert/ramp shader. The vase was made using CV cuves and finished with a blinn/ramp shader. Using key frames, one petal is animated to float down in front of the picture frame and land on the table. I positioned the petal during each key frame using the move and rotate tool. (http://www.youtube.com/watch?v=brPuVPvQgQM)

The table was constructed with a nurbs cube surface and revolved CV curves for the legs. It was finished with a black shiny blinn shader.
The lamp was made using revolved CV curves for the body and the shade as well. The shape was perfected using the scale and move tool. Spheres were used to form the chain. During the animation, this light is "turned on". Using key frames, (roughly 4 seconds into the movie), a point light is brought into the scene and an ambient light (intensity .600) is centered above the room.
The picture frame is made with 4 cubes positioned into a frame and a 5th cube formed for the appearance that it is holding up the frame. The frame is finished with a purple lambert shader. A plane is placed in the center with a file shader. The picture is of my little cousin and me in Australia this past winter.

I used the pencil tool to make the shape of the curtains. The curve was duplicated and lofted. Then, I used the lattice tool (animation>create deformers>lattice) to get the final shape, which includes an indentation for a torus to "hold back" the curtains. I added a second set of curtains that were made using the same process. This set was then animated using key frames and the lattice tool to set the positions. (http://www.youtube.com/watch?v=Z6S_5Cta6Uc) The final product shows a wind effect through the "open" window. The window was constructed using the CVcurve tool and cubes. A plane with a file shader was used to make it look as if it were night time outside. A spotlight was set to only shine on the picture so it would be illuminated before the lights were "turned on". A second spot light with a dark blue tint was used to light the room.

The rest of the room is made using 3 planes with lambert shaders. The siding decoration at the bottom is a modified cylinder.
Finally, I created a camera that would travel throughout the scene. The camera and where it would aim were key framed separately. Following the plan in the story board, I animated the camera to begin with a shot of the curtains, then pan along the wall, and finally finish with a shot of the petal falling in front of the frame.
This is the final product
EVALUATION
The project was a beneficial introduction to maya autodesk. I was able to use all the basic knowledge and even some online tutorials to create something that I am proud and that can be easily built upon.
I am very pleased with the project up to this point, I still have not decided whether or not to continue this project for my final. However, I do have a few ideas going forward. I would like to increase the detail on all of the objects in the room to make them look more realistic. For example, I would like to put a pattern texture on the curtains and the lamp shade. I have also considered a chandelier that would hang from the ceiling and clock that would be mounted on the wall. I have also considered the possibility of doing a whole room, but I would like to focus on enhancing the enhancing the look of everything that was featured in the midterm.
Wednesday, February 22, 2012
midterm proposal
After days of trying to figure out what to do for my midterm I decided to animate a slinky going down the stairs. I've found some tutorials online that will help me with the design and mechanics of this animation. None of these, however, have fully set a scene. The story board is below.

I plan on using curves for the banister and bars. For the steps i'll make a carpet and rug out of the nurbs plane and importing designs I've made in photoshop. The slinky will be the hardest part but i'm feeling pretty confident that I can complete this in the time allotted to me. Updates on progress to follow....

I apologize for the poor quality. Essentially, the scene will open with girls giggling (finalcut addition) and the slinky will begin to propel down the steps. Once it hits the bottom a "the end" sign will show across the bottom of the slinky.
HW nurb curves model
For this assignment I decided to make a simple tea set using CV curves. I used CV curves for the top and body of the pot. A nurb torus is used for the bottom and to create a small decoration on the bottom of the cup. Curves were also used for the shapes of the cup and the plate. Another torus was created and transformed to make the handle of the cup.


I decided to add a spoon and the appearance of tea in the cup. The spoon was made with a sphere for the top and a cylinder for the handle. I decorated the handle with another cylinder and torus around the middle to complete the design. The tea is made with a plane with a brown color on low opacity.

I want to play around with this scene a little more in the future by animating the teapot using key frames. I would like to used particles to create water flowing into the cup. I've stumbled across some tutorials to help me complete this idea. Below are the final render views (front and back).


Tuesday, February 21, 2012
Ball tutorial 2
I decided to make a few other changes to the ball tutorial. To start, I decided to change the texture of the ball by uploading a file. The file is an abstract water color that I found one day online. I also changed the tile colors on the floor in the attribute editor and added an orange ambient light, a blue point light, and a spot light in the back in order to see the whole ball as it bounces.


I also added fire works to go off when the ball passes through the hoop. I added two nurb cylinders on the sides of the plane. I went to Effects > create fireworks and placed the target so it would appear as if the fireworks were coming out of the poles.


This is the final render view of the ball tutorial.
Wednesday, February 8, 2012
Bouncing Ball Tutorial
The first tutorial that we were asked to complete was the bouncing ball tutorial in the Learning Maya book. After a rough start, this was the final result. Due to the book being outdated, there are some glitches in the final product, but overall the animation came out as it was intended.


This screen shot shows the unrendered view in the perspective window. As you can see, a spotlight ahs been setup to highlight the ball's bounce through the hoop. Once the animation is rendered, the flames will no longer be green (they will look like actual flames). The main problem I have experienced was that in the final render the ring was not showing up. When I deleted the ring to start over, the flames disappeared in the render so I decided to undo the delete. I figure this minor problem has to do with the book not matching the program. Either way the ball still bounces through a ring of fire. 

Professor Sanders requested that we complete the tutorial and change one thing. I decided to continue with the part of the tutorial that we didn't cover in class. This part was creating the particles. After the ball has made it through the hoop, some fire particles are supposed to attach themselves to the ball and quickly fall to the tiled floor. This process began with adding friction (geoConnector), creating a particle event, and messing around with the settings (changing number of particles, velocity, and spread). The gravity fields allowed the particles to drop faster to the ground and the render attributes allowed me to change the shape to a streak.
Wednesday, January 25, 2012
About Me
Hello,
My name is Sarah. I am an Interactive Multimedia major with a minor in Communication studies at The College of New Jersey. With a strong fine arts background, I have developed a great interest in animation, particularly stop-motion and claymation. This spring semester, I have chosen to take Animation 1 with Professor Sanders to further my knowledge in the field. This blog will be a record of the projects and tutorials I have done to share with others. I look forward to getting started!
My name is Sarah. I am an Interactive Multimedia major with a minor in Communication studies at The College of New Jersey. With a strong fine arts background, I have developed a great interest in animation, particularly stop-motion and claymation. This spring semester, I have chosen to take Animation 1 with Professor Sanders to further my knowledge in the field. This blog will be a record of the projects and tutorials I have done to share with others. I look forward to getting started!
Subscribe to:
Posts (Atom)